Guide to Repairing Cat Scratch Marks
This is a common type of damage that most cat owners are familiar with. For those with leather furniture, it's hard to avoid the cat eventually sinking its claws into it. The damage that occurs is usually one of three types: 1) deeper scratches on the side of the sofa, where the cat claws at it as it would a tree, causing the leather fibers to be exposed; 2) longer, shallower scratches on top of cushions, armrests, and backrests, which occur when the cat plays or darts around with claws extended; and 3) small holes where the cat has 'only' pressed in its sharp claws without scratching.
Deeper Cuts

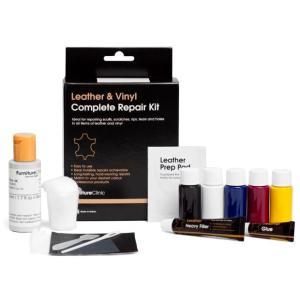
We use the following products for repairs according to the guide:
– Leather repair kit
– Leather colourant (e.g. Complete Repair Kit, or Colouring Kit)
– Surface finish (Glossy, Satin or Matte, included in the Colouring Kit)
– Sponge
You will find links to these products at the bottom of the page.
Step 1
First, clean the leather thoroughly. Then, carefully trim and sand down as much of the "frayed" leather as possible, making sure not to cause further damage.

Step 2
Next, apply Leather Binder reinforcement (included in The Leather Repair Kit) to the damaged area using a sponge. Let it dry (use a hairdryer to speed up the drying process). To achieve a strong and durable surface, apply 8-10 layers of Binder, allowing each layer to dry before applying the next.

Step 3
Take a fine sandpaper (800-1200 grit works well) and gently sand the area where you applied the Binder.

Step 4
First, make sure there is no sanding residue left from the previous step. If there are deeper cuts that are not filled with the Binder, apply a thin, even layer of Heavy Filler leather filler over the entire surface using a spatula. Let it dry for 20 minutes. Apply additional layers if necessary. The goal is to fill all holes and scratches so that the surface becomes smooth.
Step 5
Sand the surface with 800-1200 grit sandpaper to make it smooth. Wipe the area with Alcohol Cleaner to ensure no sanding residue remains.
Step 6
Now it's time to apply the Leather Colourant. Always apply the first layer with a sponge. Let it dry (you can speed up the drying process with a hairdryer). If you have a spray gun, apply additional layers with it. If using a sponge, dab on additional layers until you're satisfied. Allow each layer to dry before applying the next.

Step 7
Apply the Leather Finish. The finish, seals the colourant and gives the leather a soft and durable texture in the finish of your choice (glossy, satin or matte). Apply 2-3 layers, either with a sponge or spray gun, ensuring that each layer dries before applying the next.
All done!
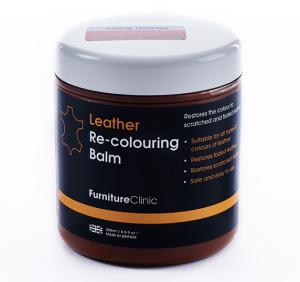
Minor Scratches
For shallower scratches, use Leather Re-colouring Balm, a pigmented leather balm. When the scratches are shallow, it is usually enough to dye them to conceal the marks and restore the sofa's appearance.

Holes from Cat Claws, Small “Pinpricks”
These holes can be filled with a leather filler, such as Heavy Filler or Flexifil. You can add a drop of leather dye in the correct shade to the filler, making it nearly invisible. Once the leather filler has dried, it may have settled a bit; if so, add more filler and repeat the process until the holes are completely filled. Once the filler is dry, you can sand it with fine sandpaper, e.g., 1200 grit, to achieve a perfectly smooth surface. Then, dye it with Leather Colourant. Note that Leather Re-Colouring Balm, the pigmented balm, cannot be used to dye the leather filler, as it cannot penetrate it.